Animator getting started
From Animuxwiki
Contents |
Download Animux
The FIRST Version of Animux is called GENESIS (meaning "the origin" or "coming into being ). It is chapter 1 of animux journey into the animation world.
Animux supports Pentium (32 Bit)/AMD (64Bit)/PowerPC hardware architectures. The 32/64 bit version of animux comes in .img and .iso format. The PPC version only comes in the .iso format.
The .img file is the live USB image. We recommend this to be written on USB 2.0 key with more than 800MB in size. The USB image cannot be directly downloaded or copied onto a USB key and set to work. Details on how to use it are given below.
The .iso file is the LiveCD image. This can be downloaded onto your machine and burnt onto a CD using the "Burn CD Image" option of your CD burning software.
We are currently working on creating torrents for our distro and will be updating the download page with them.
Links to download are here.
Preparing Media
Once you have downloaded the iso or img file you need to now prepare your install media with these files. For beginners migrating from windows or Mac, we recommend using the .iso version, even though it has missing some software packages than the liveUSB .img file. Preparing the liveCD is lot easier to do than then the liveUSB. Once you have decided to install Animux on your computer(Please review legal page), then preparing the liveUSB is just copy and paste simple one line command and run it to prepare your liveUSB Animux image.
Using Animux
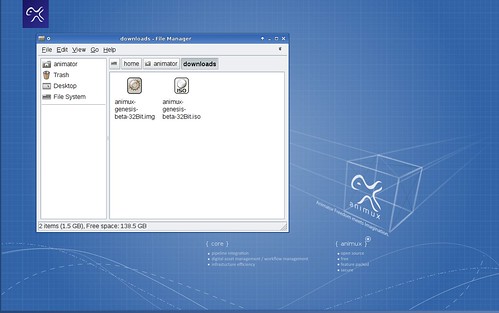
We assume you have downloaded the iso or img into the /home/animator/downloads directory as shown in the picture.
LiveCD
Start K3B under DVD Authoring/Backup menu item. Once K3B is launched, pick Burn CD Image option from "Tools" menubar as shown in the picture.
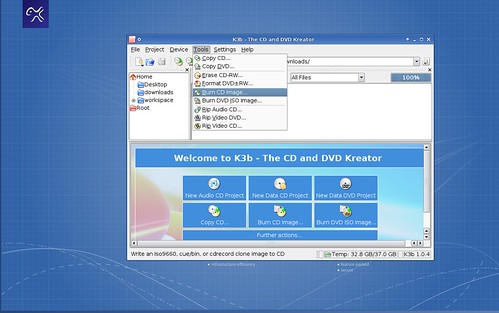
This will bring up the Burn CD Image dialog box. Click on the "Blue Folder" and pick animux-genesis-beta-xxbit.iso (xx=32or64) from /home/animator/downloads/ folder as shown in the picture.

Make sure you have a blank CD in the CD burner and click on the start button. Use the prepared disc as you liveCD bootup disc in the following steps.
LiveUSB
Our first task is to find out on which drive is the USB mounted. Animux automounts the USB drives and creates a shortcut on your desktop for easy access. You right click on the drive, go to properties to figure out where it is mounted.
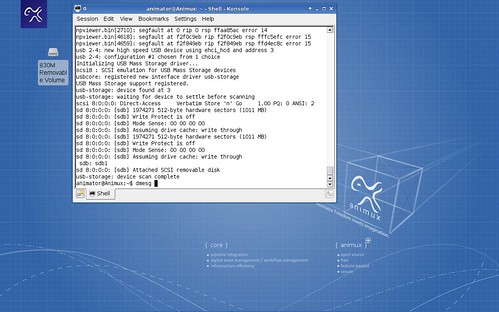
Another way to figure out is by using the dmesg command. Once you plugin the usb drive, open up a command prompt (it is the computer on the desktop panel). Type the command dmesg and hit enter. You will see the output as shown in the figure[notice the USB icon on the desktop in the same image]. You are looking for the text in the [xxx] or the xxx:xxx. In our example the drive is mounted on the sdb.
Now that we know the drive the command to write the LiveUSB image is
dd if=/home/animator/downloads/animux-genesis-beta.img of=/dev/sdb
Using Windows
Our assumption is that you have downloaded the live image into C:\animator\downloads folder.
LiveCD
Using Tools like Nero, or other CD writing programs burn the iso onto a blank CDROM. Make sure you picked the "Burn CD Image" option (or something similar to that) rather than just picking the animux-genesis-beta-xxbit.iso and burning the CD. Doing the later will only create a backup on the iso image file and does not create a bootable liveCD.
LiveUSB
We now have a LiveUSB creation method right from the windows. So this should help people who are windows users and have never worked on Unix system create a USB without having to leave the comfort of their windows OS. In order to .... (more)
Using MacOS
The Apple computers comes in 2 architectures the PowerPC (old G4/G5) and the newer Pentium Core duo processor machines. Animux runs on both these architectures. Make sure you are downloading the appropriate image for your need.
LiveCD
Here is the corresponding files you need to download for each architecture.
| Animux & Macs | |
| animux-genesis-beta-ppc.iso | G4 |
| animux-genesis-beta-ppc.iso | G5 |
| animux-genesis-beta-32bit.iso | Intel processor macs |
Preparing computer
Most modern computers come with the option of booting into the computer from other than your hard-drive namely CDROM, USB, NETWORK CARD(pxe-boot). For eg. pressing the F2 button on the Dell machines during startup gives you the option to boot from other than a Hard-Disk just for that time. This link is a good place to start to figure out what is the shortcut to boot using the CDRoM or USB key without having to update the Bios. {WARNING: Update your system BIOS, ONLY IF YOU KNOW WHAT YOU ARE DOING? YOU COULD CAUSE IRREPAIRABLE DAMAGE TO YOUR PC}
You will have to go through your motherboard manual to figure out how to set up the boot options in your bios to boot first from the USB, then CDROM and finally from the HD.
Booting into LiveCD/LiveUSB Animux
This is are simple as picking the right choice on your boot up prompt. If you are using a LiveCD then pick to boot off the CDROM. If you are using a LiveUSB, pick the USB/external HD option in your boot option.
The LiveCD/LiveUSB version of animux will only run in RAM and will not write anything onto your disk {unless you click on the animux installer programs or use the tools that are meant for hard-disc partitioning or mount external discs write onto them. IT WILL DELETE THE ENTIRE DATA ON YOUR DISC. SO PLEASE BE CAREFUL.}.
Installing Animux on your computer
Installing Animux is as easy as clicking an icon. Animux comes with an autoinstaller and an installer. The autoinstaller ...... more
Installing NVIDIA Drivers
Animux does not come pre-installed with the NVIDIA driver. Follow these instructions to install it into Animux ..... (more)

