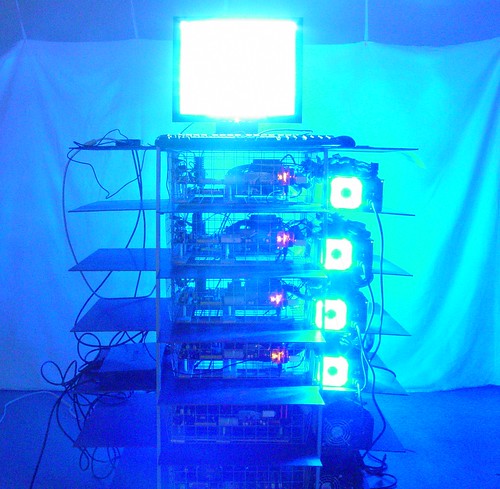
Animux Caseless "Ikea" Rackmount Renderfarm
From Animuxwiki
Goals:
- EASILY AVAILABLE COMPONENTS: Using items for the rackmount that you could find in "Ikea", "home depot" or any neighbourhood hardware store.
- EASY TO MAKE: Preparing the rackmount should not need any fancy tools but just regular household hardware tools.
- PORTABLE: Easy to move around the studio or ship to a different location.
- UPGRADABLE: Easy to upgrade, maintain. (Each node can be fixed without having to bring down the entire rackmount, if possible right on the rack itself.)
- EXPANDABLE: Easy to scale-up or scale-out. With ease to upgrade the components in each rack it easily scales-up. It is easy to add more shelves (racks) with 2 nodes, it is equally easy to scale-out.
- EFFICIENT USE OF SPACE: Safely pack as many nodes as possible in a given space.
- EFFICIENT USE OF ENERGY: Minimize the use of chasis fans to the bare minimum - CPU, PSU, Videocards. (Another benefit, reduces noise)
- STABLE & FUNCTIONAL: Runs continuously just like a high-quality/high-priced rackmount.
- BEHAVE LIKE THE PERFECT RENDFARM: Render animations jobs (using open-source tools Blender or closed source tools like Maya, 3DS Max, Lightwave, Softimage/XSI, Cinema 4D)
Hardware Specifications:
- 12 AMD Motherboards
- 12 Quad-core Phenoms
- 26x2GB (52GB RAM)
- 5 NVidia Quadro Video Cards for GPU based rendering (Gelato renderer)
- 10 NVidia video cards for GPU rendering and display
- 1 TB of HDD for NFS mount (can be easily expanded)
- 12 PSU (support GPU)
- 12 ATX Power switches
- 1 KVM Switch
- 16 Port Gigabit Switch
- 6 USB Mini Hubs
- 12 4GB USB Drives with Animux OS
- 12 Low Profile kit
Rack Specification:
- Ikea 6 shelves ANTONIUS FRAME ($11)
- Ikea ANTONIUS wire basket ($3.25)
- Home Depot Paint Stirrers (Free with-in-reason) (A 6 shelf rackmount we needed 24 big and 36 small stirrers) (We created the green screen paint at Home Depot they were generous enough to give us some)
- (#4 or #6 ) Nylon or Metal screws, washers, nuts
- 4 inch zip ties
- High density board (we used it instead of plexiglass because of the cost & board was stronger)
With a very modest budget and a talented bunch of people we were able to accomplish something, many thought was either insanity or brilliance. It tooks us 3 versions in 4 months to get it right. We find that with the final version it is easy to maintain rackmount renderfarm. Check out our original post in the animux forum on Dec 03, 2008 here.
DETAILS are available on our blog site
- A step by step guide on how we built the Animux Rackmount Renderfarm.
- Measurement templates to drill holes to fix the motherboard (takes out guess work.)
- A time-lapse Video on how we built the Animux Rackmount Renderfarm.
- How render on nodes without harddisks.
- Metrics from rendering a project to test renderfarm.
- .......any many more details...

