Animux Caseless "Ikea" Rackmount Renderfarm
From Animuxwiki
(Difference between revisions)
| Line 1: | Line 1: | ||
| - | {| | + | {| width="80%" cellspacing="0" cellpadding="0" border="0" align="center" class="FCK__ShowTableBorders" |
|+ Initial Pictures of the Renderfarm | |+ Initial Pictures of the Renderfarm | ||
|- | |- | ||
| Line 42: | Line 42: | ||
*Efficient use of energy (minimize the onboard fans to the bare minimum - CPU, PSU, Videocards) | *Efficient use of energy (minimize the onboard fans to the bare minimum - CPU, PSU, Videocards) | ||
*Should be functional, stable and handle its job well. | *Should be functional, stable and handle its job well. | ||
| + | |||
| + | |||
| + | |||
| + | Details coming soon... | ||
| + | |||
| + | #A step by step guide on how we built the Animux Rackmount Renderfarm. | ||
| + | #Measurement templates to drill holes to fix the motherboard (takes out guess work.) | ||
| + | #A time-lapse Video on how we built the Animux Rackmount Renderfarm. | ||
| + | #How to run a renderfarm without a harddisks on a each rendernode. | ||
| + | #Metrics from rendering a project to test renderfarm. | ||
| + | #.......any many more details... | ||
Revision as of 09:52, 23 March 2009
|
|
|
|

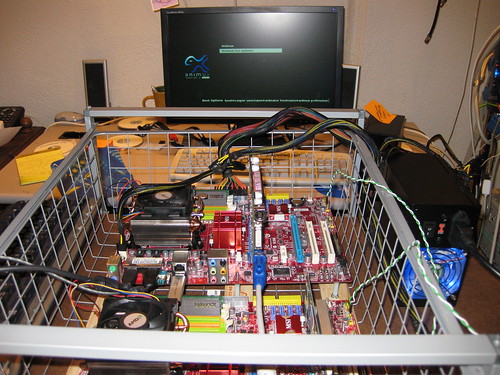
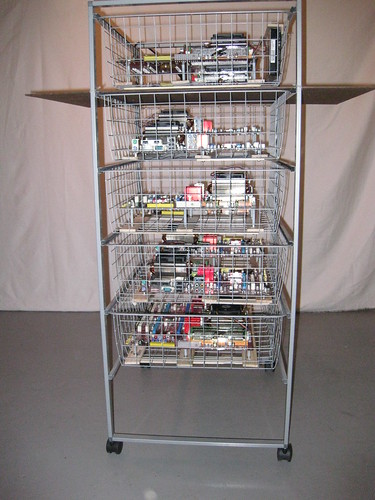
Setting up a 48 CPU core renderfarm on an Ikea shelf is finally complete. With a very modest budget and a talented bunch of people we were able to accomplish something, many thought was either insanity or brilliance. It tooks us 3 versions and 4 months to get it right. We find that with the final version it is easy to maintain rackmount renderfarm.
Goals:
- Using items for the rackmount that you could find in "Ikea", "home depot" or any neighbourhood hardware store.
- Preparing the rackmount should not need any fancy tools but just regular household hardware tools.
- Should be portable. Easy to move around the studio or shipping it to a different location.
- Easy to upgrade, maintain. (Each node can be fixed without having to bring down the entire rackmount)
- Easy to expand. (Should be easy to scale out or add new nodes to the rackmount.)
- Efficient use of space. (Try to safely pack as many nodes as possible in a given space.)
- Efficient use of energy (minimize the onboard fans to the bare minimum - CPU, PSU, Videocards)
- Should be functional, stable and handle its job well.
Details coming soon...
- A step by step guide on how we built the Animux Rackmount Renderfarm.
- Measurement templates to drill holes to fix the motherboard (takes out guess work.)
- A time-lapse Video on how we built the Animux Rackmount Renderfarm.
- How to run a renderfarm without a harddisks on a each rendernode.
- Metrics from rendering a project to test renderfarm.
- .......any many more details...

